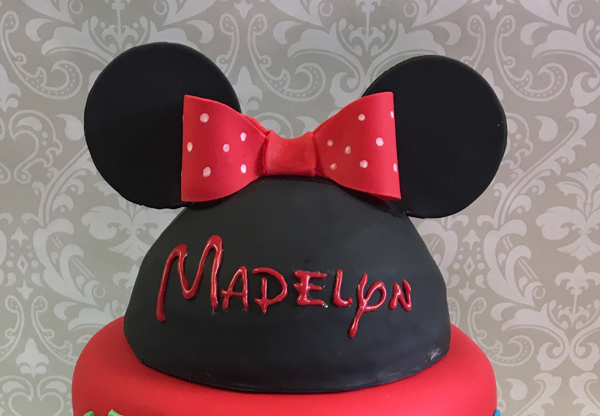
I made this adorable Mickey Mouse hat cake topper for my best friends daughter on her first birthday. She is a huge Mickey Mouse Clubhouse fan so I was not surprised when they made that the theme of her party.
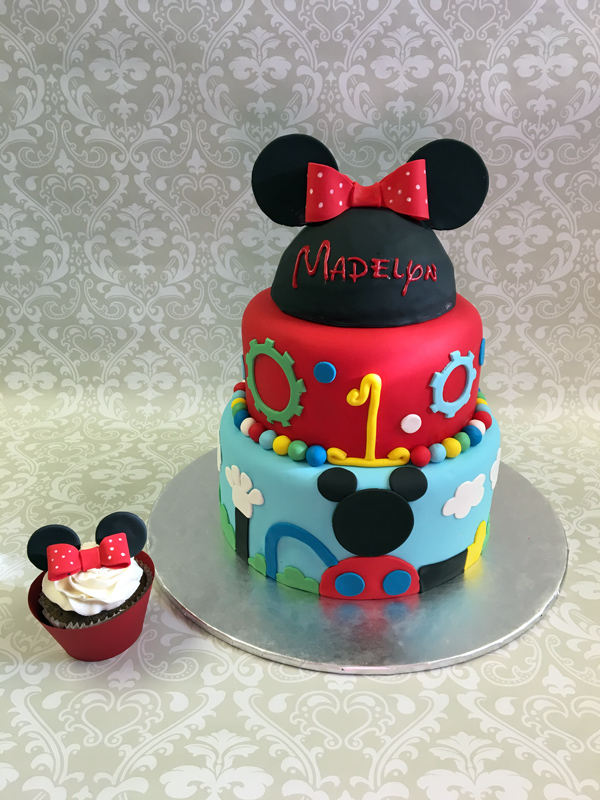
The cake design was taken from a picture my friend found on pinterest. Since it isn’t my original design rather than go through how I made the entire cake I thought I would show how I created the Mickey Mouse hat cake topper. If you want to see how to made the cut Minnie/Mickey Mouse cupcake shown in the picture check out my other post.
All the links below are to the specific equipment/ingredients that I use.
Equipment needed:
- Sports Ball Pan
- 6 cups Rice Krispies cereal
- 6 cups Mini-marshmallows
- 3 Tablespoons Butter
- Buttercream frosting (your favorite recipe)
- Satin Ice Black Fondant
- Satin Ice Red Fondant (optional for bow)
- Circle Cutters (3.5-4 inch)
- 6 inch long cookie sticks (at least 2 sticks)
- 6 Inch Cake Circles
How to make the Mickey Mouse Hat Cake Topper
Step 1
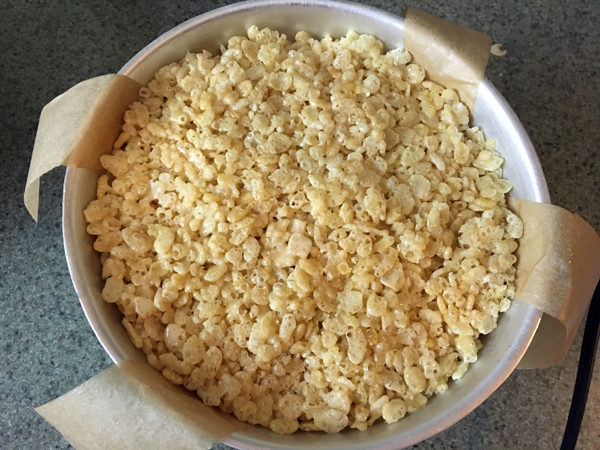
The sports ball pan will be used as a mold for the hat, so the first step is to grease the pan using either a light brushing of oil or non-stick spray. I also highly reccomend cutting out a few strips of parchment paper to line the pan with as shown in the picture below. This will make it a lot easier to un-mold the topper once it has set.
Next make up a batch of rice krispie treats, you can use your favorite recipe or the one I used in my Valentines Day heart treats post. While the rice krispies are still warm pour them into the sport ball pan and press down to make sure they are level. Allow the mixture to cool completely before trying to un-mold, I usually just leave it overnight.
Step 2
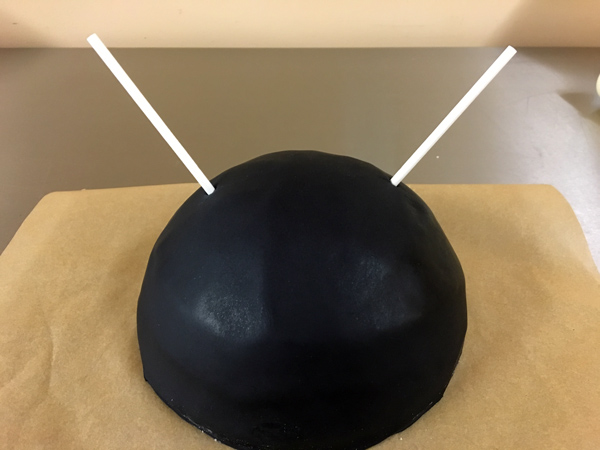
The next day you can use the parchment “tabs” to release the half-ball. Next use a dab of buttercream to attach the half-ball on a cake circle (you can trim the cake circle if it is a little too big). Use your favorite buttercream frosting to completely cover the ball. Be sure to fill in all the nooks and crannies to make a smooth appearance. I like to keep the ball on a piece of parchment paper to make it easier to move.

Step 3
Next roll out a circle of fondant large enough to cover the entire ball. Smooth the fondant all the way around and trim, be careful not to trim too much around the bottom, you don’t want any white to show through. At this point you can also take the cookie sticks and determine their placement.
Step 4
To make the ears of the hat roll out more black fondant, about 1/8 inch thick and cut out two circles using your cutters. I recommend making extra circles in case of breakage, so cut out 4 total if you have extra cookie sticks, otherwise 2 is fine. Put the circles on a piece of parchment dusted with a little powdered sugar to keep them from sticking and allow to dry. Once again at least overnight, but even longer if you have the time. These circles will be the front of the ears so you want them as flat as possible.
Once these circles are dry use a spatula to lift them off the parchment to make sure they are not sticking. Use some sugar glue or just water to brush the entire back of the dried circles. Lay the cookie stick right in the middle of each so that it is almost to the top.
Roll out more black fondant and cut out another 4 (or 2) circles. Place these on top of the cookie sticks, lining them up with the dried circles. Gently press down to get the two circles to stick and make sure the cookie stick is fully surrounded.
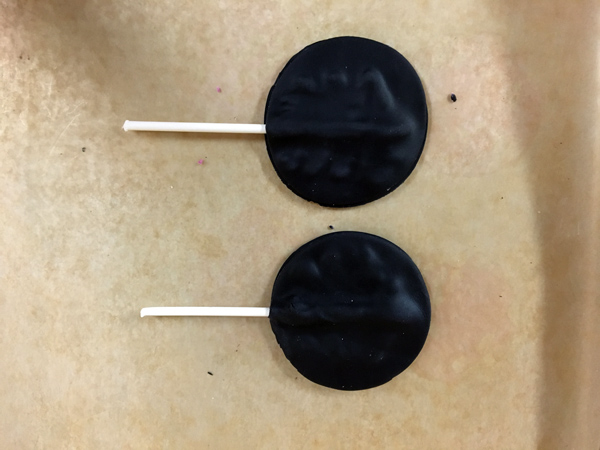
Allow the “ears” to dry completely (at least a day to be safe). By sandwiching the cookie stick in between the two circles of fondant you have secured them while keeping once side nice and flat to be the front of the ears. Once they are dry you can attach them to the ball by sliding them into the holes you created earlier.

Step 5
At this point you can also add a bow if you want to make it a Minnie Mouse hat. Roll out some red fondant and follow the bow instructions found on my Minnie Mouse cupcake post. I also used a little white food coloring and a paint brush to paint little polka dots on the bow. To make larger bows you can use a circle cutter. Roll the fondant out thick, cut out a circle, then use a small rolling pin to elongate the circle into an oval.

Step 6
To create the writing I downloaded a Walt Disney font for my computer (just google Walt Disney font) and printed out the birthday girls name. I then taped it to the topper and used a pin to create an outline of the name as a guide. I chose to use red melted chocolate to do the writing, which was a little messy, so instead I recommend using royal icing if you have the time to make it.
I hope this helps you make an awesome Mickey Mouse Hat cake topper for your next cake!
Leave a Reply
You must be logged in to post a comment.